
These cute little mailboxes can be found at Target in the dollar section "Right now" they are a very seasonal item, I use them in the store and fill them with hersey's kisses and attach balloons for Valentines day. But I think there are a lot of uses for them.
I made two different ones yesterday and took pictures of both, so for this, I'm going to choose which picture is best to show you how to do this . . . so please don't focus on the paper change . . .
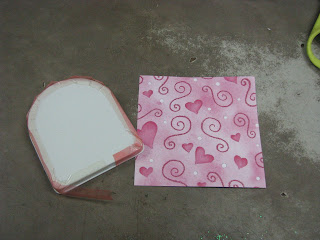
Lets get started~ You will need-
~A mail box , or two (Or 48, that's how many I'm making, but then I'm a bit of a neurotic freak so don't try to keep up with me, I'm nuts) :)
~Scissors (I like fiskars, but use what you want, they are your scissors, but in my humble opinion Fiskars are the best!)
~ A REALLY SHARP exacto knife or craft knife, (It has to be really sharp or you will rip your paper up)
~ the double sided red line tape, (I guess you can use what ever kind of double sided tape you want, but this is my favorite) I use both the 1/2 inch size and the 1/4 inch size, but I think you could use what ever you have or like.
~3 different kinds of 12x12 scrapbook paper, (Do NOT try to use card stock, you want the thin paper.) Personally I think that the papers that have matching colors, but are totally different make for the coolest looking boxes. (If you are a scrapbooker, then this is a good time to use up some of your scraps, the ends of the box are perfect places to get rid of the little pieces of paper you have laying around.)
~ cutter
~Ribbons, and embellishments
Here we go~ 
You want to tape around the ends of the mail box, do both ends, for this I use the 1/2 inch red line tape, but I'm sure the smaller stuff would work too.
Cut a 4x4.5 piece of paper, in what ever pattern you want. Peal off the protective plastic on the tape and then, here is the important part. Line up the end of the paper with the metal ridge and press it in place. Fold the edges up.
 Now you will take your REALLY sharp exacto knife or craft blade (BE CAREFUL AND DON'T CUT YOUR SELF~ your knife is VERY sharp!) and you will trim off the excess right above the metal ridge, the ridge really helps you to get a nice clean strait cut.
 Do both ends. See you are doing it! What a great job you are doing! (My hands look just like my moms . . .I hadn't noticed that before.)
Now for the main part of the mail box. You will want to cut one of your papers to 4x12
 (I'm an not very good at EXACT measurement, so you will have to kind of wing it like I do) Now you are going to cut a hole in your paper about 1/2 an inch in and about 3 or 4 inches up from the bottom of the paper. (Boy, I really think I need to have my nails done if I'm going to show my hands this much!!!) After you cut your little hole, then make a slit out of it, that is about an inch and a half to 2 inches long.
Ok, we are in the home stretch . . .
Put the red line tape (I used the 1/4 inch stuff here) on the bottom of the box. You can either peal off the sticker on the bottom or leave it on, you are covering it any way. If you peal it off you get this goober stuff that looks icky, but don't worry, your little mail box will be super cute in a minute . . . no goobers allowed!

Also, at this point you will want to lift the little flag on your box and put a piece of tape there, again the 1/4 inch if you are switching out the size tapes you are using. Again, remember you can uses what ever size double sided tape you have on hand.

Now comes the hardest part of this whole project.
You are going to slide your cut, slitted paper over the flag.

Ok . . . now work really hard and line up the edges so that you don't have it crooked. Once you get this straight, hold it tight and pull the tape that is right there by the little flag, this will hold your paper in place
 After you get this part stuck down, pull the tape you have on the bottom of the box and start wrapping the paper around.

Now put a piece of the double sided tape on this little flap and glue it down.
 Now you got the mail box mostly done.
It looks like this~
You will want to take some ribbon and decorate the pole on the flag . . . I usually do about 4 - 6 pieces of ribbon. And since I'm a florist, I make sure I "dove tail" the ends of the ribbon. (that means you cut it into a "V", it just makes it look finished and pretty.
Now on the end that comes off, you will want to decorate the inside. I'm of the mind, do it as simple as possible, if you can figure out how to make a pattern for the inside of the lid, do it! It's simple that way. If you can't make a pattern, then you will take a 4x4 piece of paper and tape it into the lid, and then crimp the edges so that it fits EXACTLY into the inside of the lid.

If your craft knife isn't sharp enough you will rip your paper, like I just did! CRUD!

See? you really need to make sure your knife is sharp.
Well once you get that all cut out, (or cut up in my case) you are pretty much done.
Fill your boxes with whatever kind of wonderful thing you can think of . . . My honey loves Everlasting Gobstoppers, so I think I will make one and fill it with that for him. 
This is a simple and fun project. It doesn't take that long to make, and its super cute. I hope you enjoy doing it! If you have any questions let me know, and I will do my best to confuse you even more . . . or answer your question, what ever comes first! :) Good luck!

Very cute! Too bad I don't have more time for crafts. The day will come I know...but for now I'll admire your work from afar. It reminds me of when you taught me how to make a covered photo album. That was Bryan's first photo album until it got ruined and I had to throw it away.
ReplyDeleteThank you!!!
ReplyDeleteSome day you will have tons more time to do this kind of thing, and maybe the kids will do them with you. Till then you can keep up with what's going on, and then go crazy when you have the opportunity.
Great tutorial, Cheri! I made these before but used my ATG. You know how unforgiving that glue can be?!! I ripped a few before finishing. I love the idea of the red tape. I have some getting dusty.
ReplyDeleteThanks! I didn't know if it made sense to anyone other than me . . . so I'm happy to know its a good one!
ReplyDeleteI love love love the red tape!!! I use it for EVERYTHING!
Thanks for this great tutorial. If I can get to Target, I'll pick up a few and give it a try!
ReplyDelete